
Let shoppers dress a model and add the whole outfit to the cart.
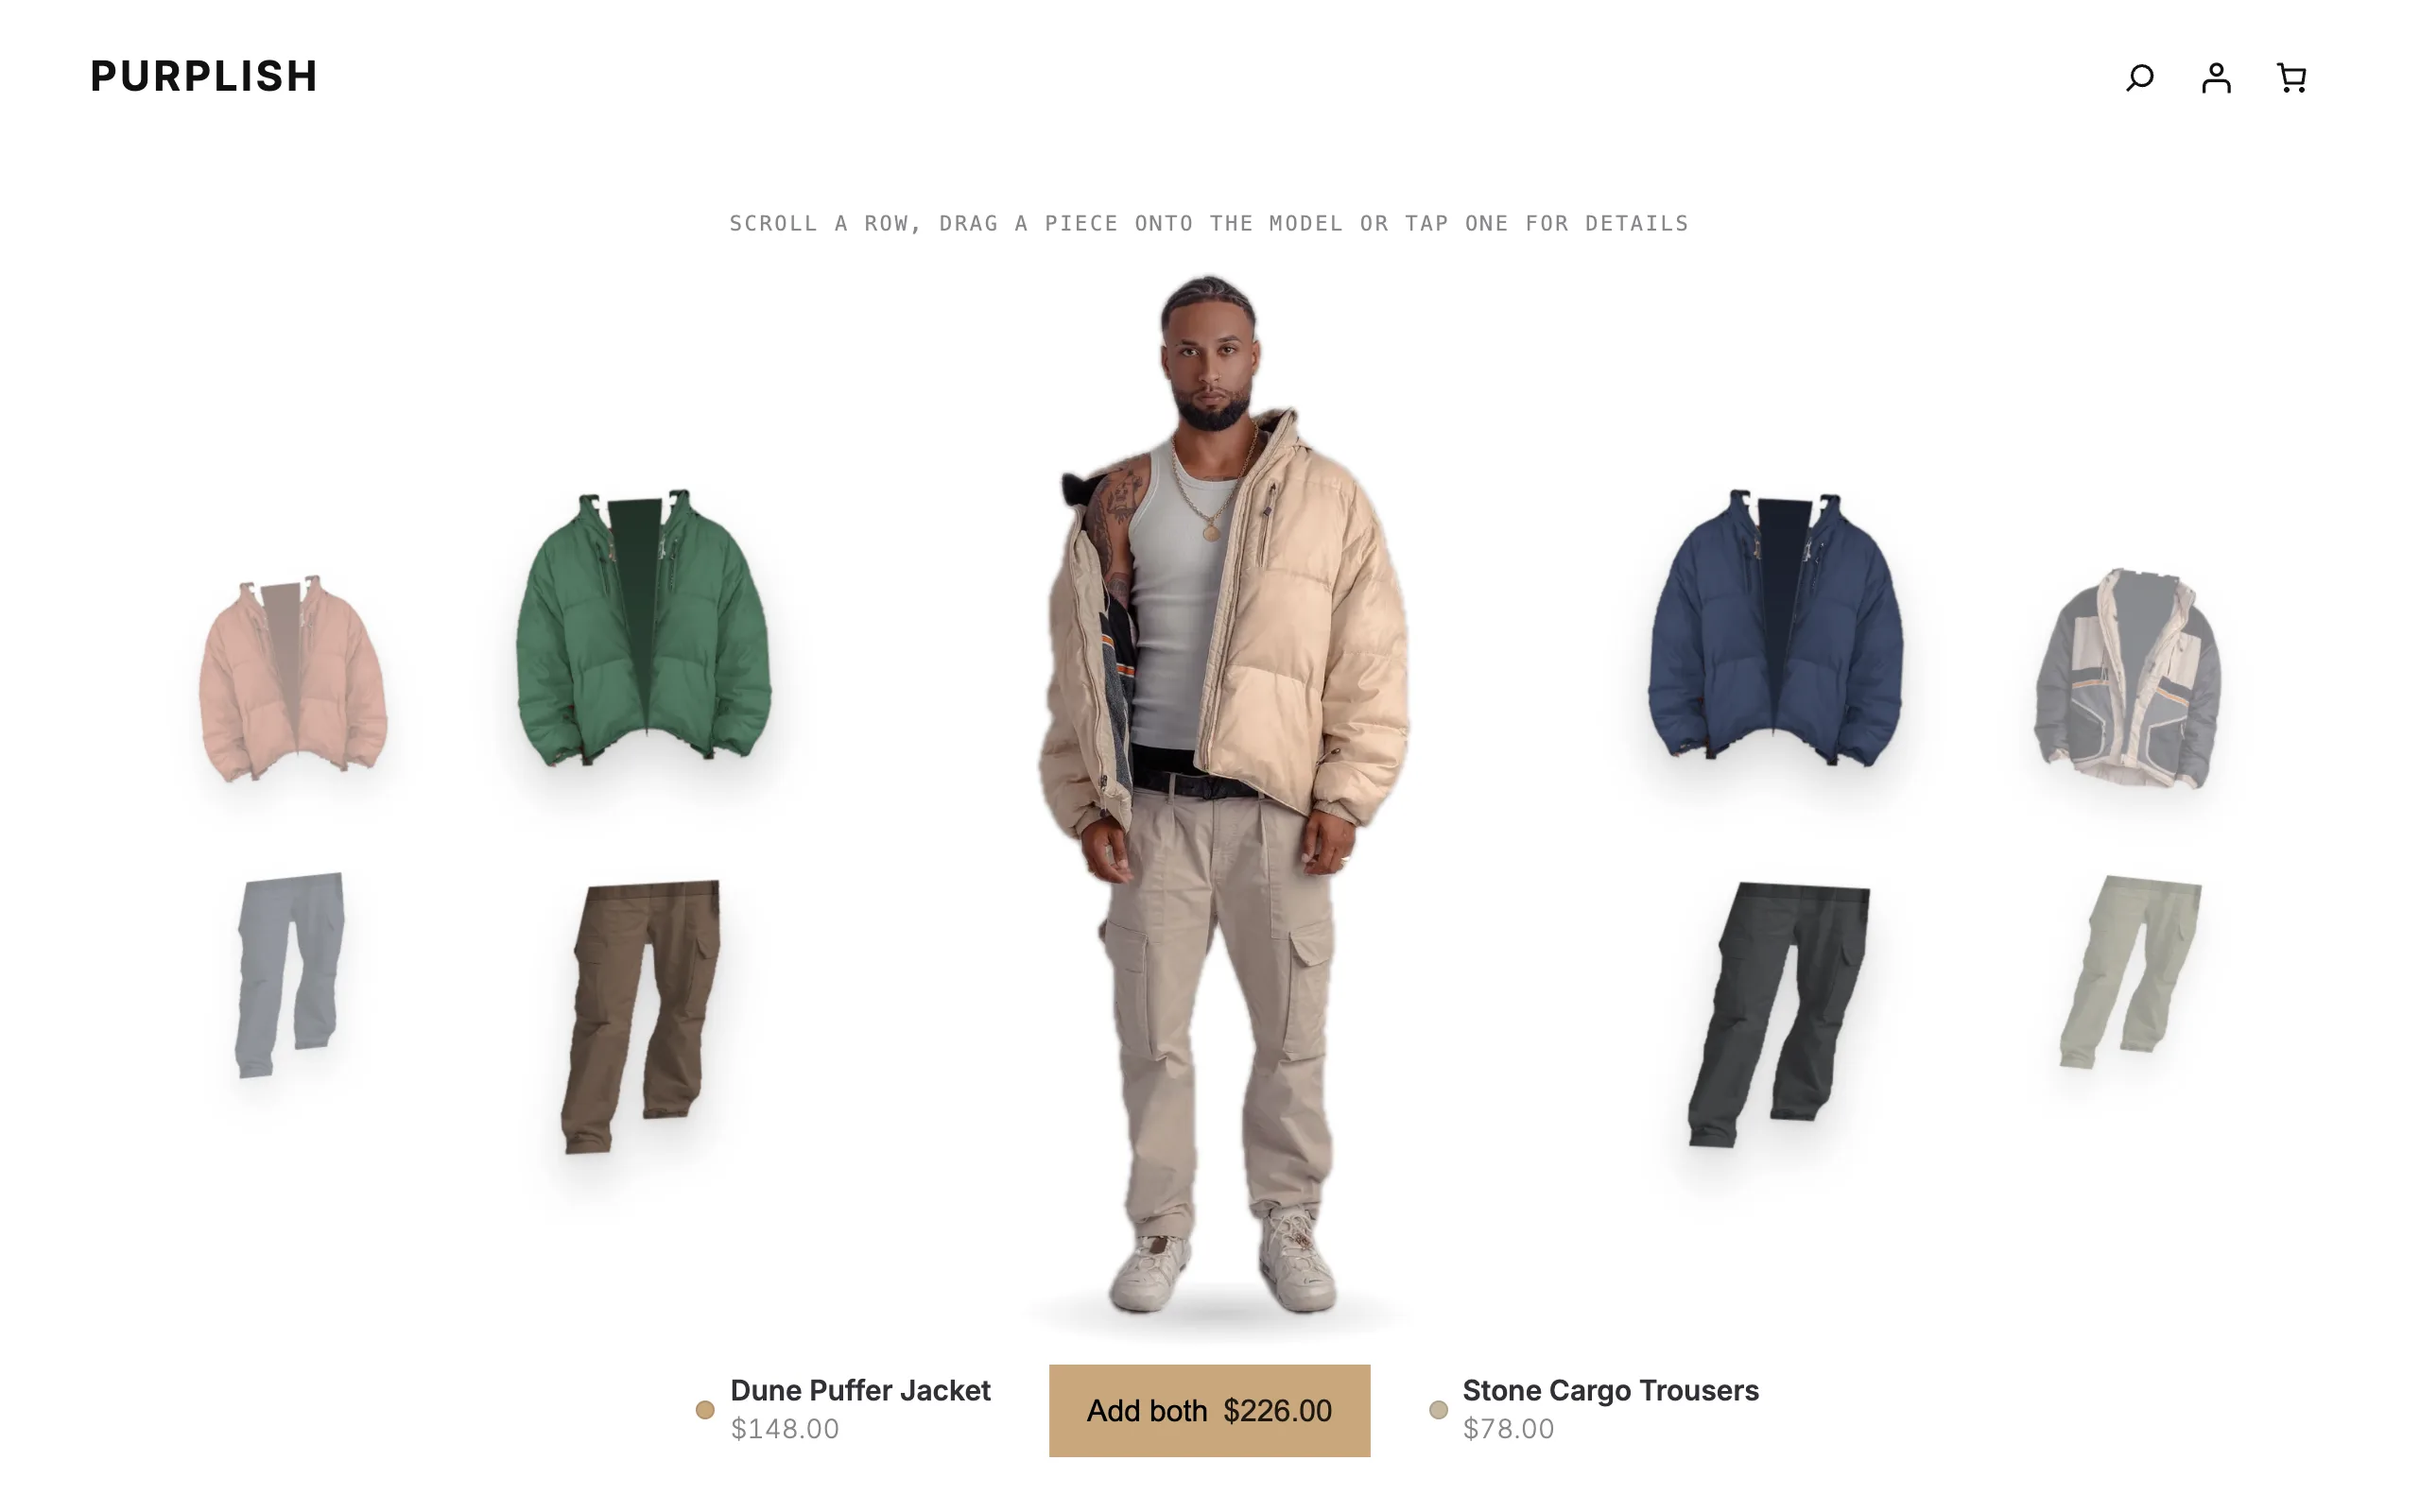
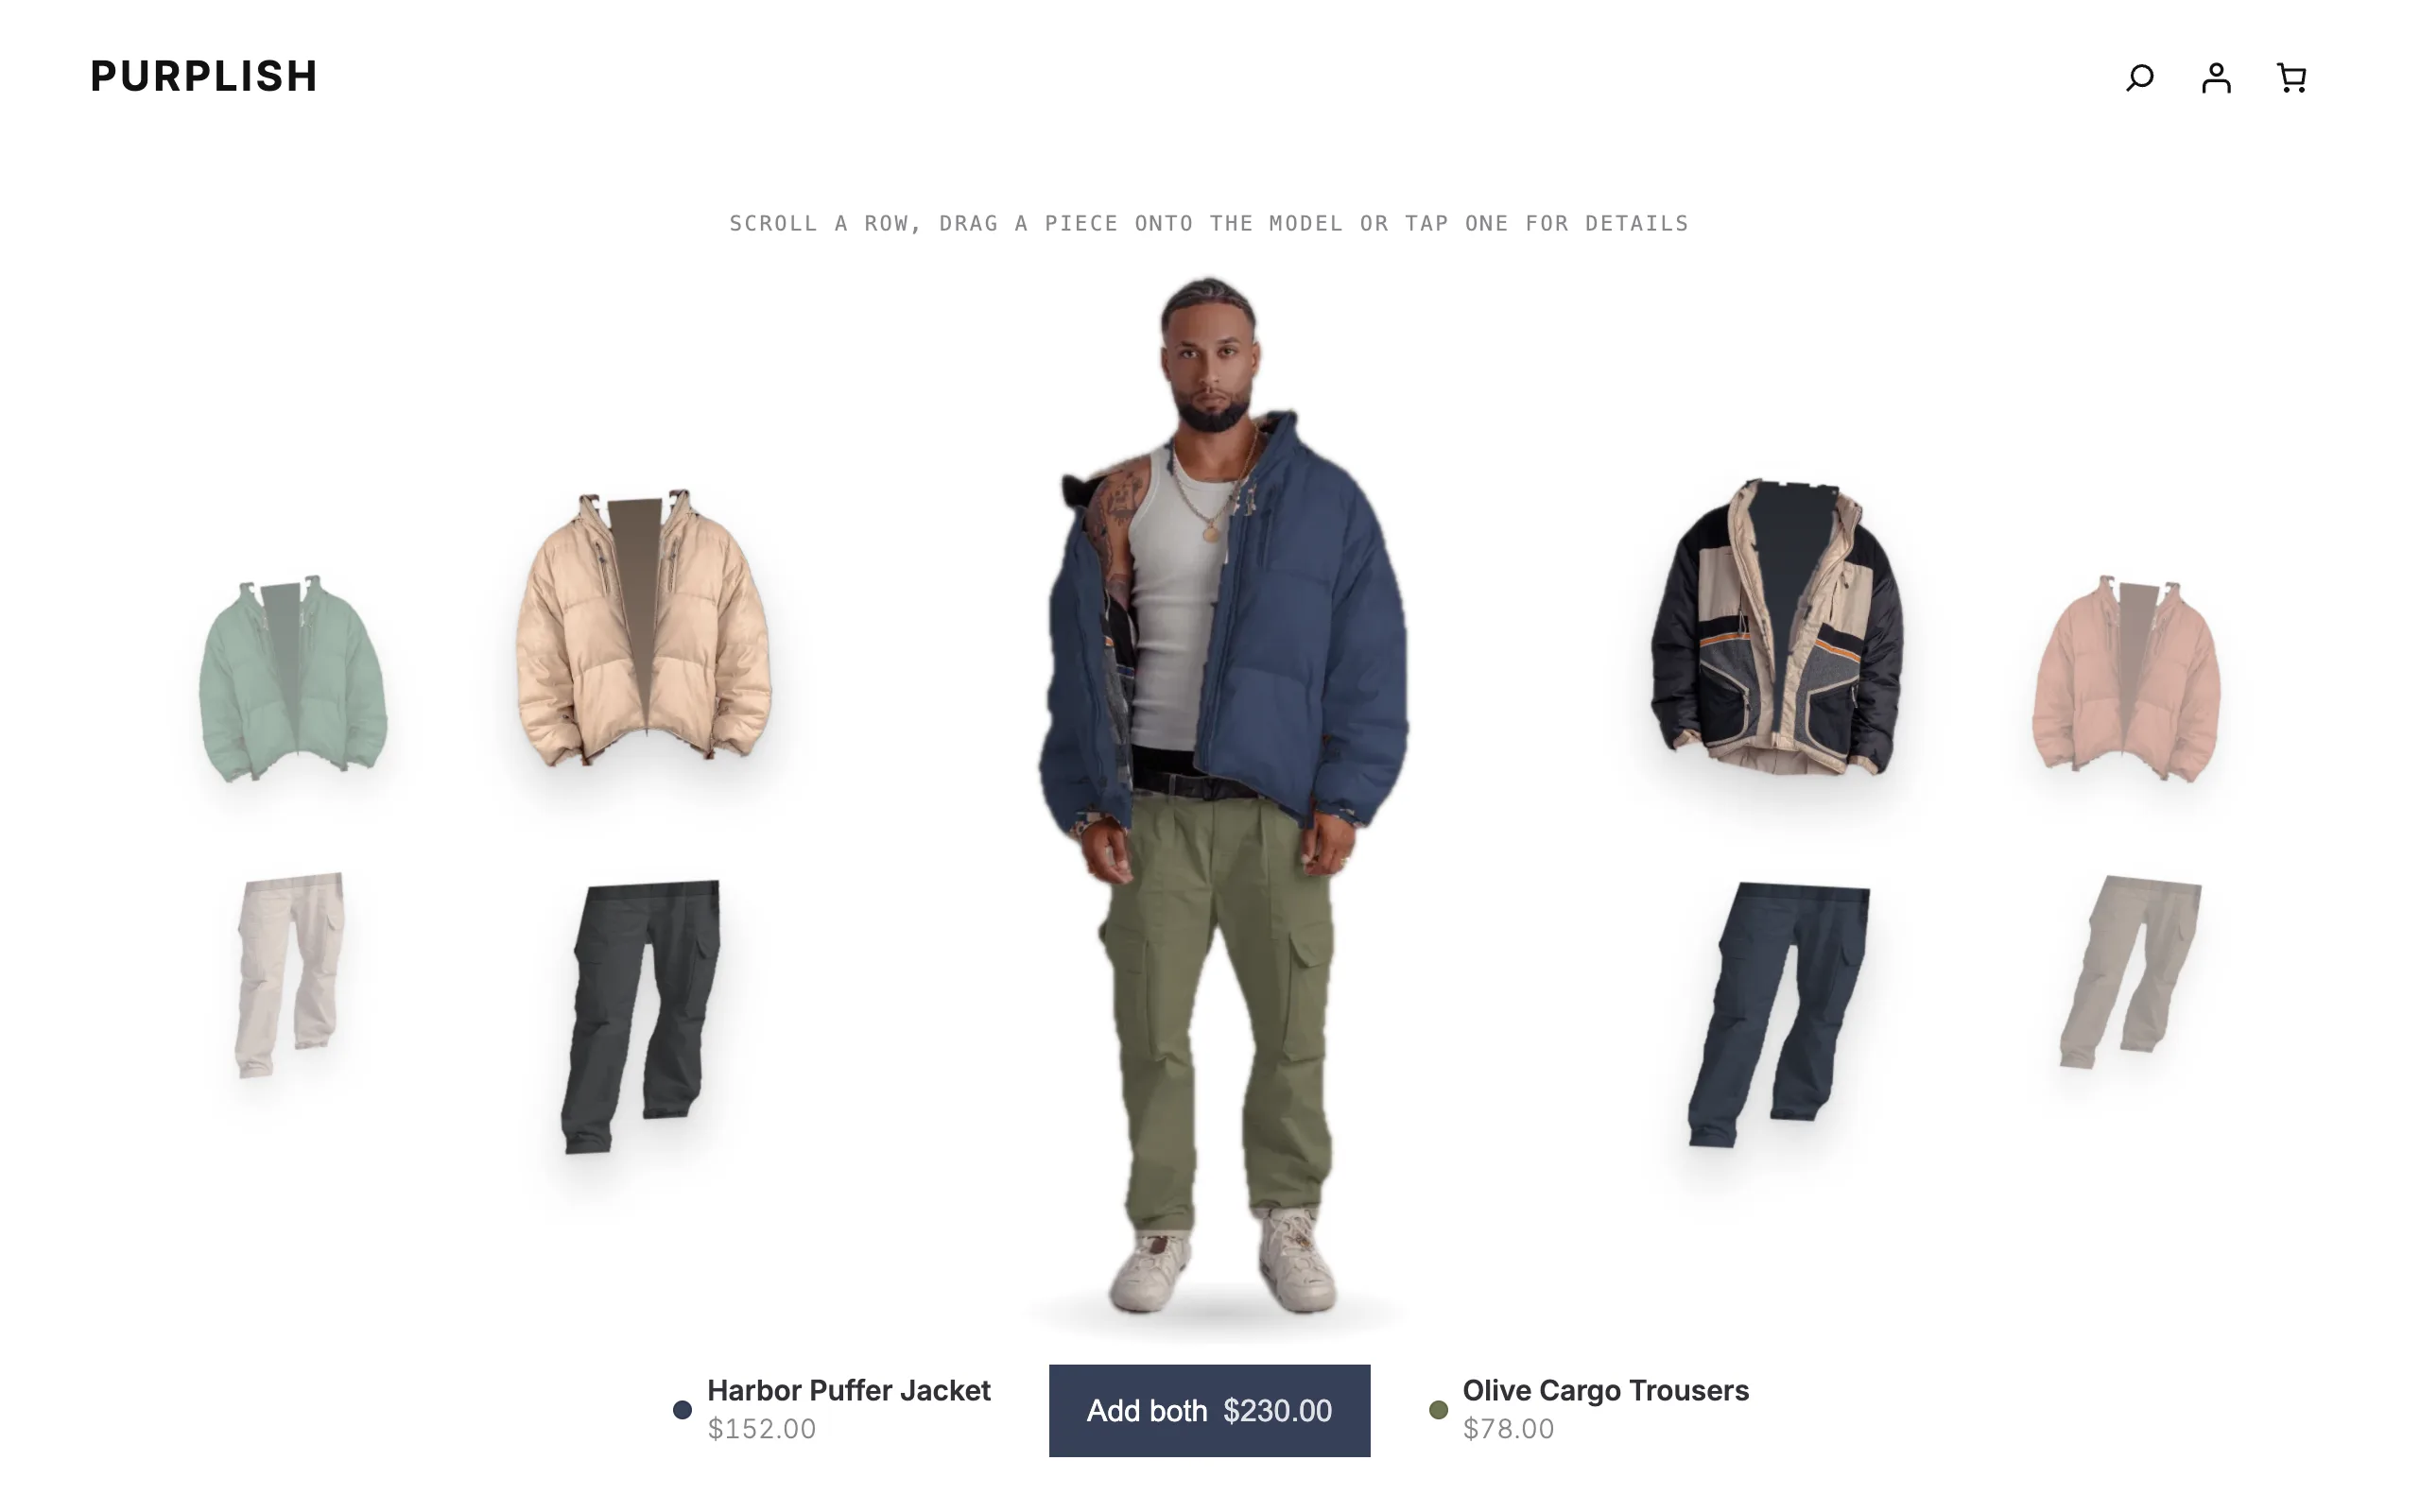
Changing Room is a Purplish block for WooCommerce. Tops and bottoms turn in two rings around a photo of a model, and shoppers drag a piece onto him to see the outfit.
Free and open source. New in Purplish 1.3.
Add it like any other block.
Changing Room sits in the Purplish group of the block inserter. Inside it are Piece blocks, one for each product, and each Piece goes in the top ring or the bottom ring.
- Add the block
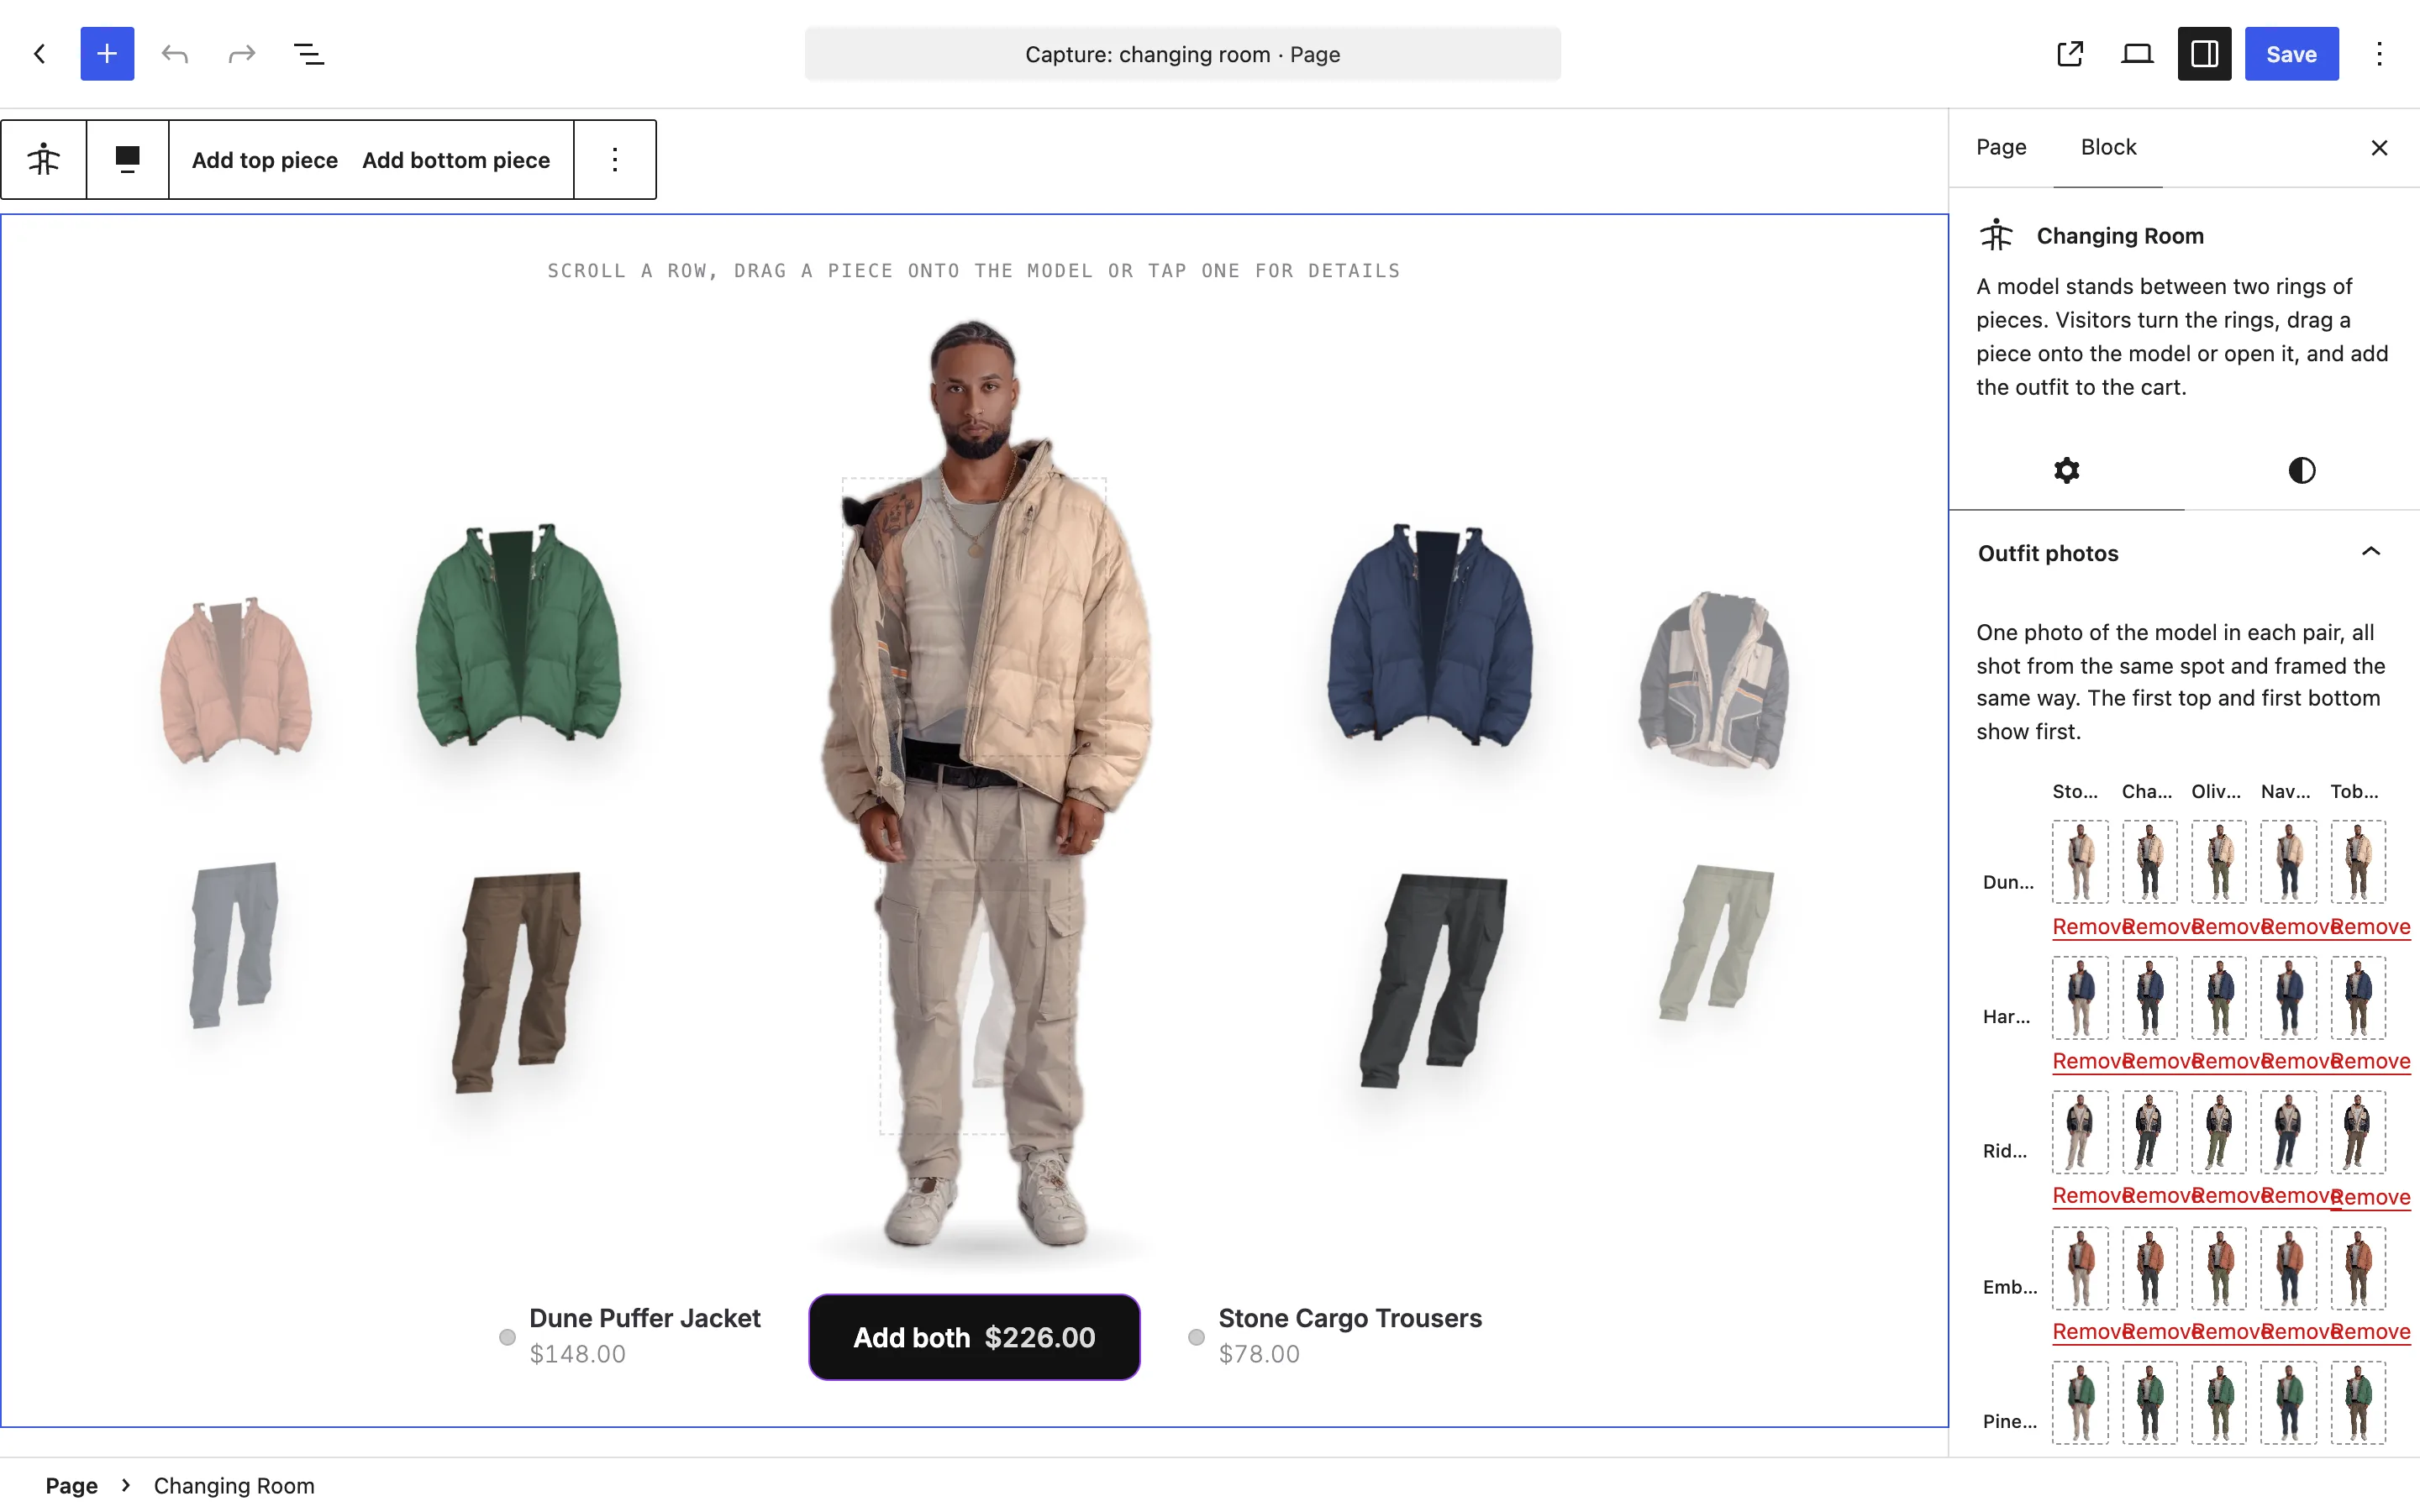
Insert Changing Room on any page. It starts with three top pieces and three bottom pieces, and Add top piece and Add bottom piece in the toolbar add more.
- Pick a product for each piece
Search for it in the Piece panel and choose its Ring. Add a flat Cut-out with a transparent background, or the product image shows.
- Add a photo for each pair
In Outfit photos, pick one photo of the model wearing each top and bottom pair.
Shoppers drag a piece onto the model.
A shopper picks up a jacket or a pair of trousers and drops it on the model. The ring springs round, and his photo changes to the new pair. Nothing moves until a shopper does.
Turning the rings
- Drag it on. A piece dropped on the model goes on him, and its ring turns to it.
- Scroll or swipe a row. A mouse wheel or trackpad over a ring turns it, and so does a swipe across it.
- Press an arrow key. With a piece focused, the left and right arrows turn its ring.
Under the model
- What he wears. The name and price of the top and the bottom he has on. A tap on either opens its panel.
- Add both. One button with the total for the pair, updated with every change.
- Colors that follow. When your products have a Purplish page color, the buttons take the color of the piece he wears.
Tap a piece for sizes, then add the whole outfit.
A tap opens a panel from the side with the piece's photo, price, stock and sizes, plus Details and About tabs. Try it on puts it on the model, and Add to cart adds that piece alone.
- Sizes from your variations. Each variation shoppers can buy is a size button, with its own stock line.
- Add both asks first. When a piece needs a size, the panel opens and asks for it, then both go into the cart together.
- After adding. A notice shows the photo, the names and sizes, and a View cart link. With a Mini-Cart on the page, the photo flies into it.
One photo for each pair.
The model is a real photo. In the Outfit photos panel, the tops run down the side and the bottoms across the top, and each cell holds the photo of that pair.
- Same spot, same frame. Shoot every pair from the same spot and frame it the same way, so only the clothes change.
- The first pair loads first. He wears the first top and the first bottom when the page opens, and their photo loads with the page.
- Your pick of change. Set Photo change to Fade, Reveal from the top or Instant.
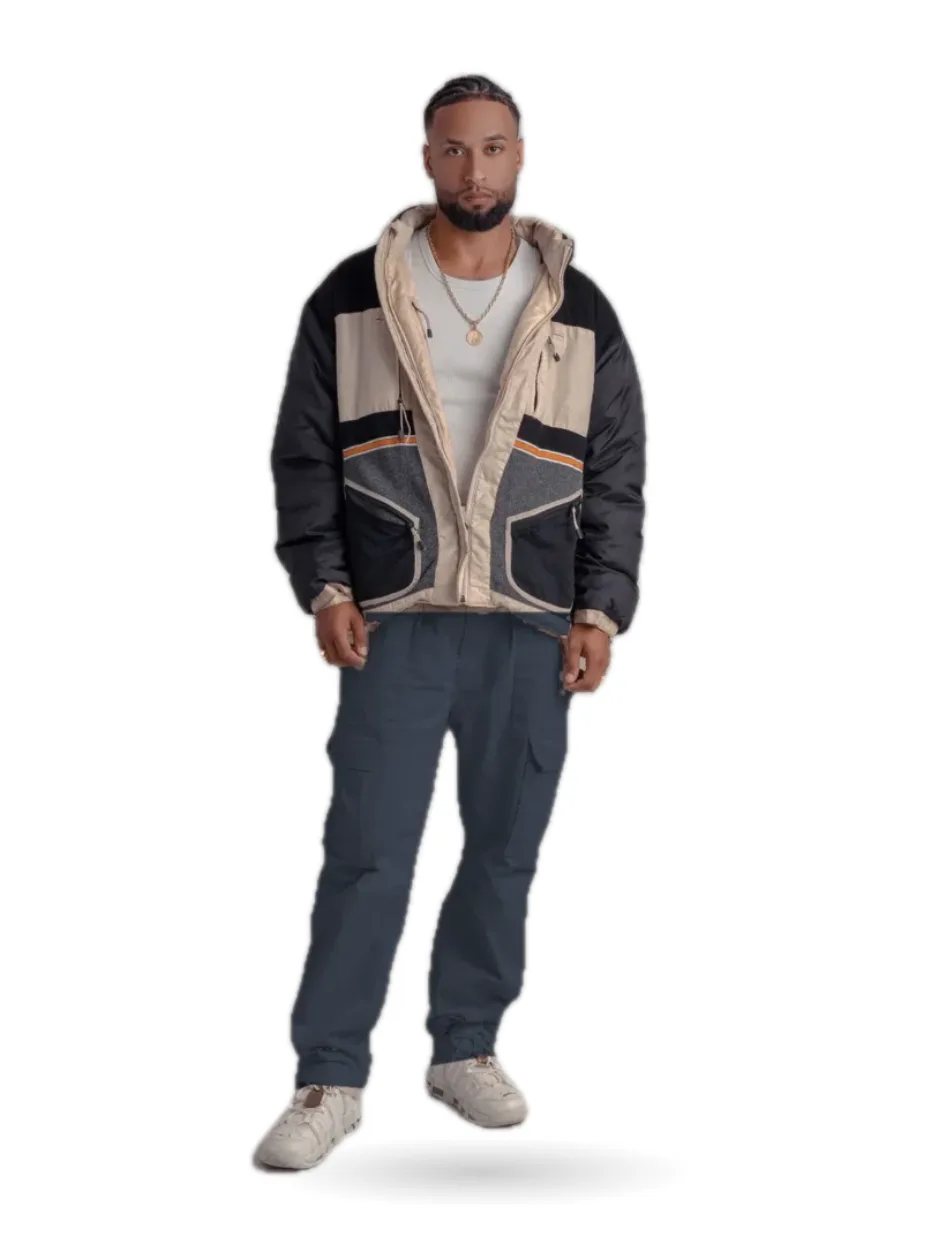 Ridge and Navy
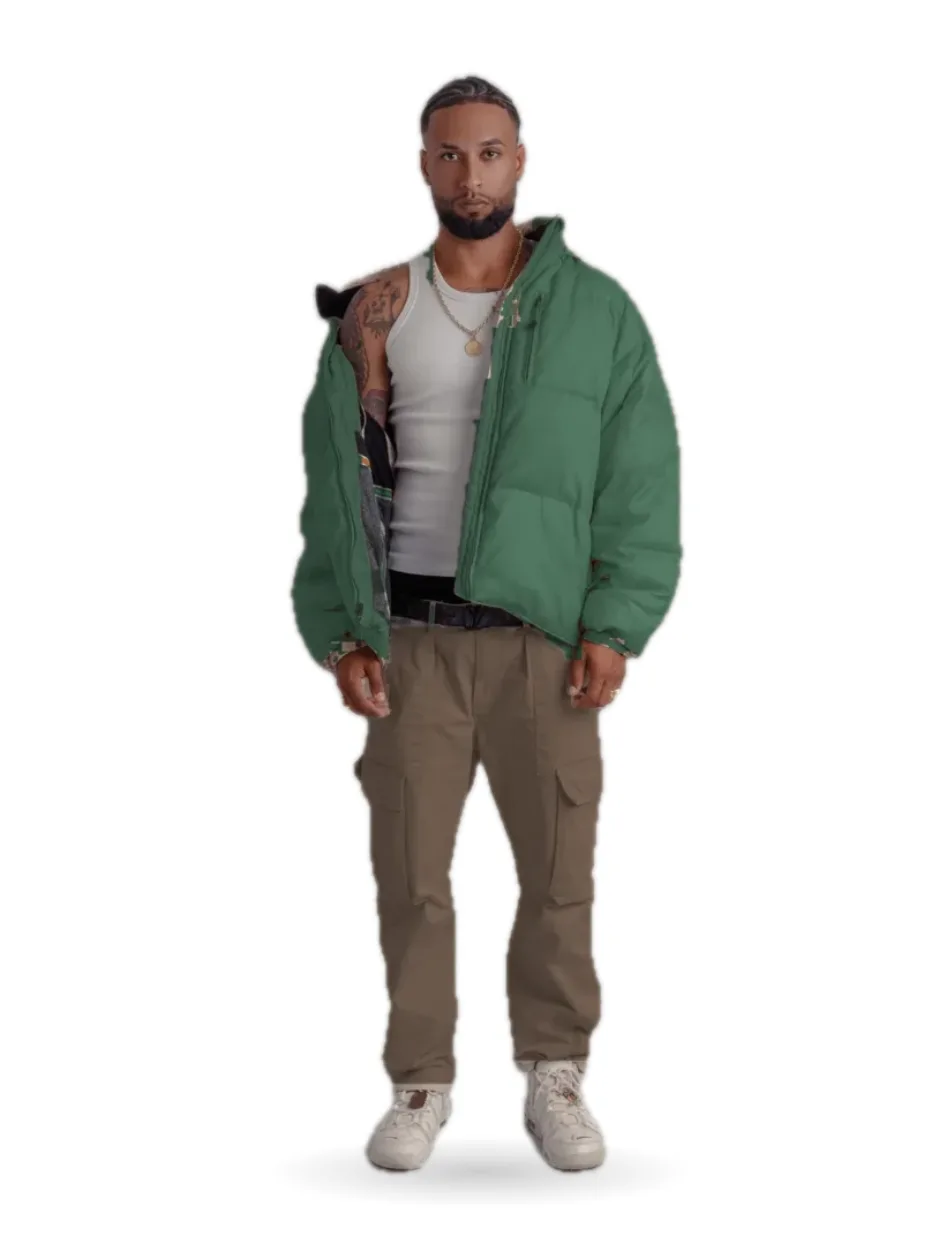 Pine and Tobacco
Share a look with a link.
Every change puts the outfit in the page address. Send that link, and the Changing Room opens on the same top and bottom.
- No reload. The address changes as shoppers try pieces on, and the page stays put.
- The whole look comes back. The photo, the names, the prices and the Add both total all match the shared pair.
- Nothing to set. Every Changing Room does it.
Every option sits in six panels.
Select the Changing Room and its settings show in the block sidebar, in the order you'd set them up.
- Outfit photos
- One photo of the model for each top and bottom pair.
- Rings
- Top ring name and Bottom ring name, Jacket and Trousers until you change them, and Far pieces for the smaller, faded pieces two steps round.
- Show
- Heading, Hint, What he wears, Add both button and Details panel, with its Details tab, About tab and Try it on button.
- Moves
- Drag onto the model, Scroll to turn, Swipe to turn, and Photo change: Fade, Reveal from the top or Instant.
- Look and color
- Button look: Theme button, Glow, Sweep, Glass or Spectrum. Page color from the last piece worn, the top, the bottom or off, and the Color area it covers: the buttons and notice, the whole block or the whole page.
- After adding
- Added notice with a View cart link, and Fly to cart into the Mini-Cart.
Each Piece has its own panel with its Ring, Product and Cut-out.
Good to know before you add it.
How the Changing Room behaves for every shopper, on every device.
- Phones and touch
When the block is 700 pixels wide or less, each ring shows the near pieces only, with what he wears under him. Shoppers swipe a row to turn it or tap a piece to open it.
- Keyboard and screen readers
Every piece is a button, and the arrow keys turn its ring with focus following along. Screen readers hear which pair he wears, and the panel closes with Escape.
- Reduced motion
Visitors who ask their device for reduced motion get every change at once, without the spring, the fades or the photo flying to the cart.
- A pair without a photo
The last photo stays on screen with the line "No photo of this pair yet", while the names and total still change. In the editor, the block asks for that pair's photo.
- Tops and bottoms both
The room needs at least one top and one bottom with a published product. Without either, it shows nothing on the page.
- Speed
The script is 5 KB gzipped and the styles 4 KB, and only pages with a Changing Room get them. The rings and the first outfit are in the page before the script runs.
More of Purplish
- ShowfloorShop the look on a turning floor, with one button that adds the whole look.
- WardrobeA mega menu with category links, photo tiles and a look for each link.
- RunwayA line of product photos that shoppers walk look by look.
- Product page colorsThe button, the selected option and the sale badge follow the color the shopper picks.
- Cart and checkoutLooks for the cart, the checkout, the Mini-Cart drawer and the thank-you page.
- Shop pagesFlagship, Atelier and Boutique shop patterns, with Shelf Tag and Color Dots.
Changing Room questions.
What store owners ask about the room. The docs cover every option.
How do I add an outfit builder to my WooCommerce store?
Add the Changing Room block from the Purplish group in the block inserter. Pick a product for each Piece and put it in the top ring or the bottom ring, then add one photo of the model for each pair in the Outfit photos panel.
Do I need a photo for every top and bottom pair?
Yes, one photo per pair, so three tops and three bottoms need nine photos. Shoot them from the same spot and frame them the same way. A pair without a photo keeps the last photo on screen with a short "No photo of this pair yet" line.
Can shoppers add the whole outfit to the cart at once?
Yes. Add both adds the top and the bottom he wears in one go. When a piece needs a size, the panel opens and asks for it first. Shoppers can also add one piece from its panel.
Does it work with variable products and sizes?
Yes. Each published variation that can be bought shows as a size button in the piece's panel, with its stock. With the Details panel turned off, a variable piece that needs a size opens its product page instead.
Give your shoppers a changing room.
Add the Changing Room block, pick the tops and bottoms, and let shoppers put the outfit together.
Free and open source. New in Purplish 1.3.